
Dropped ceiling with halogen spotlights
Overhead lighting for a unique ambience
Online since: 22/12/2008,
Number of visits: 373441
1

Mr Maalman lowered the ceiling in his bathroom and installed two halogen spotlights in it.
Of course, it would also be possible to use LED spotlights.
In addition, the edge of the ceiling panel is illuminated by two energy-saving bulbs that are located between the MDF board and the ceiling.
LED strips could be used as an alternative.
This lateral recess is also called a shadow gap.
The lowered ceiling and the integrated spotlights create a truly unique ambience in Mr Maalman’s bathroom.
At first glance, the structure looks quite ordinary.
However, strong pot magnets were used to attach the MDF board to steel Z-profiles – which is not visible from the outside.
The big advantage: If necessary, the dropped ceiling can be removed at any time.
To lower the ceiling, Mr Maalman used the following materials:
- 2 Halogen spotlights
- 2 energy-saving light bulbs
- 1 large MDF board (particleboard), at least 2 cm thick
- 9 countersunk pot magnets CSN-25
- 9 Z-profiles with drilled holes
First, Mr Maalman mounted the spotlights on the ceiling in the desired position.
He placed the energy-saving light bulbs, which are supposed to illuminate the edge of the dropped ceiling, further to the side.
Next, he cut the MDF board to the right size.
Compared to the ceiling, it is a few centimetres shorter on each side to allow room for the shadow gap.
He cut round holes in the board where the halogen spotlights are located.
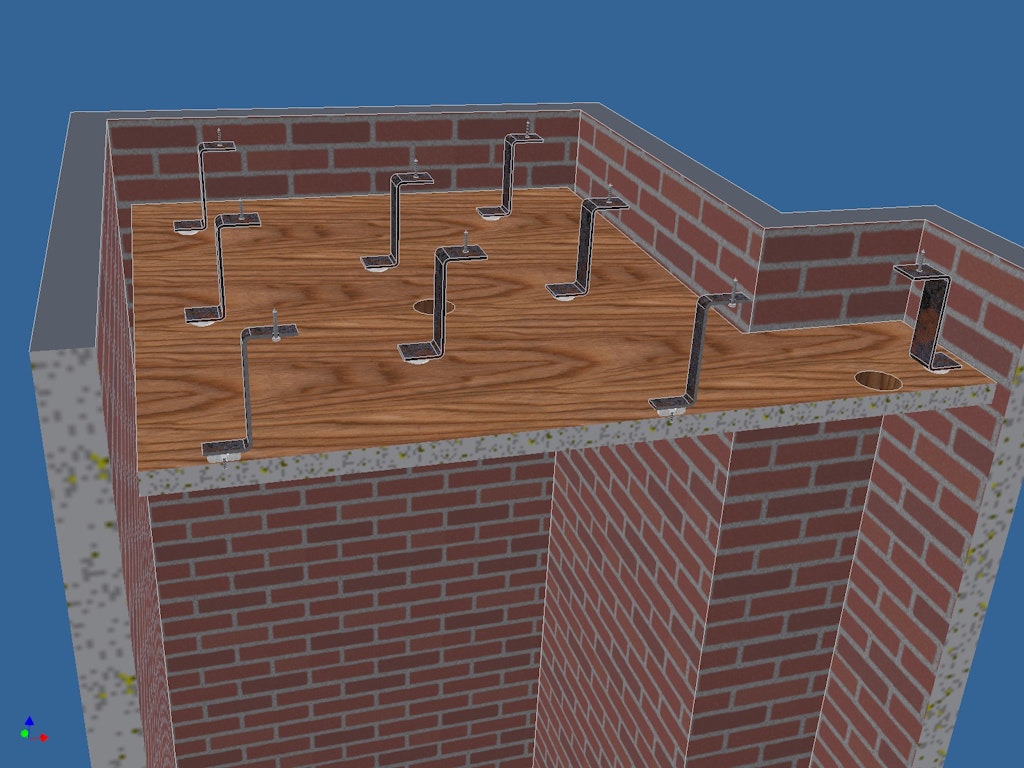
Then he used screws to attach the nine steel Z-profiles to the ceiling.
He also screwed nine pot magnets type CSN-25
to the board, making sure the position of each magnet matched the position of a Z-profile on the ceiling (see illustration).

The computer graphics show where the screws are attached.

View of the dropped ceiling from above at an angle
Lastly, he could simply snap the board, which had been “prepped” with the magnets, onto the Z-profiles.
And thus, the lowered ceiling with built-in halogen lights is complete.
Thanks to the many magnets, it holds extremely well on the Z-profiles..

This dropped ceiling with magnet assembly has several advantages:
- It doesn't cost much (affordable materials)
- It can be removed easily
- The light is not completely blocked; thanks to the shadow gap, light shines through all around the edges
Articles used
Load...


neodymium pot magnet Ø 25 mm with countersunk hole, holds approx. 19 kg,
| 1 pc. | 4,32 EUR ea.* | |
| from | 3 pcs. | 3,79 EUR ea.* |
| from | 10 pcs. | 3,31 EUR ea.* |
| from | 20 pcs. | 3,08 EUR ea.* |
| from | 40 pcs. | 2,87 EUR ea.* |
| Ask for a rebate from 220 pcs. | ||
Available: 175 788 pcs.

neodymium pot magnet Ø 25 mm with counterbore hole, holds approx. 14 kg,
| 1 pc. | 3,81 EUR ea.* | |
| from | 3 pcs. | 3,31 EUR ea.* |
| from | 10 pcs. | 2,86 EUR ea.* |
| from | 20 pcs. | 2,65 EUR ea.* |
| from | 40 pcs. | 2,46 EUR ea.* |
| Ask for a rebate from 200 pcs. | ||
Available: 24 326 pcs.
One person likes this customer project
-Projects are bookmarked in your customer account


keywords
The entire content of this site is protected by copyright.
Copying the content or using it elsewhere is not permitted without explicit approval.
Copying the content or using it elsewhere is not permitted without explicit approval.